GREENSTONE DIGITAL LIBRARY DEVELOPER'S GUIDE
Chapter 1 Understanding the collection-building process
Contents
End users of Greenstone can build collections using the Collector, described in the Greenstone Digital Library User's Guide(Section ). This makes it very easy to build collections modelled after existing ones but with new content. However, it is not really feasible to use the Collector to create collections with completely new structures. It does invite you to edit the collection configuration file, which governs the collection's structure, but you need to know quite a lot about Greenstone to make radical yet effective changes. This section tells you what you need to know to do this. It also describes the Greenstone directory structure and the format in which documents are stored internally.
We assume throughout this manual that you have installed Greenstone on your computer, be it Windows or Unix. If you have not yet done this you should consult the Greenstone Digital Library Installer's Guide. The name GSDLHOME is used throughout to refer to the Greenstone home directory, which is called %GSDLHOME% on Windows systems and $GSDLHOME on Unix ones. You set this directory during the installation procedure.
1.1 Building collections from the command line
Let us begin by walking through the operations involved in building a collection from the command line, to help understand the process better. Of course, for more user-friendly collection building, you should use the Collector instead. The collection we take as an example is one that comes on the Greenstone software distribution CD-ROM, and contains the WWW home pages of many of the people who have worked on the New Zealand Digital Library Project and the Greenstone software.
Separate subsections follow for building under Windows and Unix. In fact, the two subsections are very nearly identical—you need only go through the one that pertains to your system. When following the walkthrough, you may find some operations mysterious and arcane, but follow them closely—their meaning will be explained later on. After the walkthroughs is a brief summary of the differences between building a collection under the two systems.
Collection building under Windows
The first challenge when building a Greenstone collection from the command line under Windows is to get at the “command prompt,” the place where you type commands. Try looking in the Start menu, or under the Programs submenu, for an entry like MS-DOS Prompt, DOS Prompt, or Command Prompt. If you can't find it, invoke the Run entry and try typing command (or cmd) in the dialog box. If all else fails, seek help from one who knows, such as your system administrator.
Change into the directory where Greenstone has been installed. Assuming Greenstone was installed in its default location, you can move there by typing
(You need the quotation marks because of the space in Program Files.) Next, at the prompt type
This batch file (which you can read if you like) tells the system where to look for Greenstone programs.[1]If, later on in your interactive session at the DOS prompt, you wish to return to the top level Greenstone directory you can accomplish this by typing cd "%GSDLHOME%" (again, the quotation marks are here because of spaces in the filename). If you close your DOS window and start another one, you will need to invoke setup.bat again.
Now you are in a position to make, build and rebuild collections. The first program we will look at is the Perl program mkcol.pl, whose name stands for “make a collection.” First run the program by typing perl —S mkcol.pl to cause a description of usage and a list of arguments to appear on the screen —if your Windows environment is set up to associate the Perl application with files ending in .pl, this can be more concisely expressed by entering mkcol.pl. As you can see from the usage statement, the only required argument is creator, which is used to specify who built the collection.
Let us now use the command to create the initial files and subdirectories necessary for our home page collection of Greenstone Digital Library project members. To assign the collection the name dlpeople, I typed
(or mkcol.pl —creator [email protected] dlpeople if Perl is associated with the .pl file extension). Please substitute your email address for mine!
To view the newly created files, move to the newly created collection directory by typing
|
creator [email protected]
|
|
maintainer [email protected]
|
|
public true
|
|
beta true
|
|
indexes document:text
|
|
defaultindex document:text
|
|
plugin ZIPPlug
|
|
plugin GAPlug
|
|
plugin TEXTPlug
|
|
plugin HTMLPlug
|
|
plugin EMAILPlug
|
|
plugin ArcPlug
|
|
plugin RecPlug
|
|
classify AZList -metadata "Title"
|
|
collectionmeta collectionname "dlpeople"
|
|
collectionmeta iconcollection ""
|
|
collectionmeta collectionextra ""
|
|
collectionmeta .document:text "documents "
|
You can list the contents of this directory by typing dir. There should be seven subdirectories: archives, building, etc, images, import, index and perllib.
Now we must populate the collection with sample documents. Source material for the dlpeople collection can be found on the Greenstone distribution CD-ROM under the directory collect\dlpeople. First, insert the CD-ROM into the drive (e.g. into D:\). Next, copy the contents of the D:\collect\dlpeople directory into the dlpeople collection's import directory. You can do this as follows:
select the contents of the dlpeople directory
and drag them into the dlpeople collection's import directory.
Alternatively, you can type the command
In the collection's etc directory there is a file called collect.cfg. Open it using your favourite text editor —a basic but commonly available one is called edit. It should look something like Figure 1, which shows the collection configuration file that was created by using the command perl —S mkcol.pl —creator [email protected] dlpeople.
Now you are ready to “import” the collection. This is the process of bringing the documents into the Greenstone system, standardising the document format, the way that metadata is specified, and the file structure in which the documents are stored. Type perl —S import.pl at the prompt to get a list of all the options for the import program. The -remove old option is used to ensure that any previously imported documents are removed first.
Don't worry about all the text that scrolls past—it's just reporting the progress of the import. Be aware that importing this collection takes about five minutes on a 1 GHz computer, and correspondingly longer on slower machines. Note that you do not have to be in either the collect or dlpeople directories when this command is entered; because GSDLHOME is already set, the Greenstone software can work out where the necessary files are.
Now let's make some changes to the collection configuration file to customize its appearance. First, give the collection a name. This will be treated by web browsers as the page title for the front page of the collection, and used as the collection icon in the absence of a picture. Change the line that reads collectionmeta collectionname "dlpeople" to something like collectionmeta collectionname "The People of the NZDL project".
Add a description of your collection between the quotes of the line that reads collectionmeta collectionextra "". This is used as the About this collection text on the collection's home page. I added “This collection is made up of the home pages of some of the people who have worked on the NZDL project.” It is important to enter this as a single line in the editor —don't be tempted to press enter if the cursor reaches the right-hand side of the editor window even though there is more text to add, just keep on typing —otherwise the configuration file cannot be parsed correctly. If you want your collection to be usable with different language interfaces, there is a way to make this text come out differently depending on the interface language chosen. This is described in Section 1.5 below.
You can use any picture you can view in a web browser for a collection icon—the image I created is shown in Figure 2. Put the location of the image between the quotes of the line collectionmeta iconcollection "" in the configuration file. As shorthand, and to aid portability _httpprefix_ can be used as the start of a URL that points to an image within the Greenstone file area. For example you could enter: _httpprefix_/collect/dlpeople/images/icon.gif if you have put a suitable image in the collection's images directory (collect\dlpeople\images in our example).
Save the collection configuration file, and close it—you won't need to look at it again during this tutorial.
The next phase is to “build” the collection, which creates all the indexes and files that make the collection work. Type perl —S buildcol.pl at the command prompt for a list of collection-building options. These options are explained more fully in Section 1.3. For now, stick to the defaults by typing
Again, don't worry about the “progress report” text that scrolls past.
Make the collection “live” as follows:
select the contents of the dlpeople collection's building directory and drag them into the index directory.
Alternatively, you can remove the index directory (and all its contents) by typing the command
and then change the name of the building directory to index with
Finally, type
in preparation for any future rebuilds. It is important that these commands are issued from the correct directory (unlike the Greenstone commands mkcol.pl, import.pl and buildcol.pl). If the current working directory is not dlpeople, type cd "%GSDLHOME%\collect\dlpeople" before going through the rd, ren and mkdir sequence above.
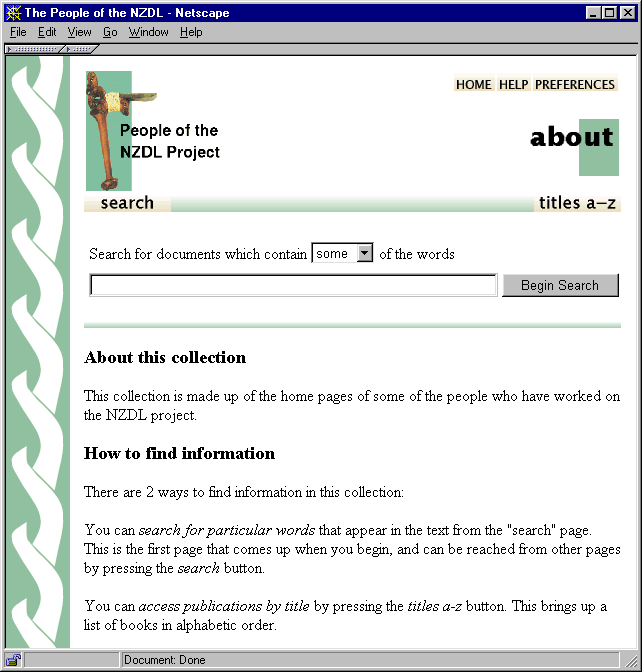
You should be able to access the newly built collection from your Greenstone homepage. You will have to reload the page if you already had it open in your browser, or perhaps even close the browser and restart it (to prevent caching problems). Alternatively, if you are using the “local library” version of Greenstone you will have to restart the library program. To view the new collection, click on the image. The result should look something like Figure 3.

In summary then, the commands typed to produce the dlpeople collection are:
Collection building under Unix
First change into the directory where Greenstone has been installed. For example, if Greenstone is installed under its default name at the top level of your home account you can move there by typing
Next at the prompt, type
These batch files (which you can read if you like) tell the system where to look for Greenstone programs. If, later on in your command-line session with Greenstone, you wish to return to the top level Greenstone directory you can accomplish this by typing cd $GSDLHOME.
If you are unsure of the shell type you are using, enter echo $0 at your command-line prompt —it will print out the sought information. If you are using a different shell contact your system administrator for advice.
With the appropriate setup file sourced, we are now in a position to make, build and rebuild collections. The first program we will look at is the Perl program mkcol.pl, whose name stands for “make a collection.” First run the program by typing mkcol.pl on its own to cause a description of usage and a list of arguments to appear on the screen. As you can see from the usage statement, the only required argument is creator, which is used to specify who built the collection.
Let us now use the command to create the initial files and directories necessary for our home page collection of Greenstone Digital Library project members. To assign the collection the name dlpeople, I typed
Please substitute your email address for mine!
To view the newly created files, move to the newly created collection directory by typing
You can list the contents of this directory by typing ls. There should be seven subdirectories: archives, building, etc, images, import, index and perllib.
Now we must populate the collection with sample documents. Source material for the dlpeople collection can be found on the Greenstone distribution CD-ROM under the directory collect/dlpeople. To get information from a CD-ROM under Linux, insert the disk into the drive and type
at the prompt (this command may differ from one system to another). Once mounted, the CD-ROM can be used like any other directory, so type ls /cdrom/collect. This should reveal a directory called dlpeople on the CD-ROM.
Next, copy the contents of the /cdrom/collect/dlpeople directory into the GSDLHOME/collect/dlpeople/import directory. To do this, type the command
Then type
to close the CD-ROM drive.
In the collection's etc directory there is a file called collect.cfg. Open this using your favourite text editor —emacs is a popular editor on Linux. It should look something like Figure 1, which shows the collection configuration file that was created by using the command mkcol.pl —creator [email protected] dlpeople.
Now you are ready to “import” the collection. This is the process of bringing the documents into the Greenstone system, standardising the document format, the way that metadata is specified, and the file structure in which the documents are stored. Type import.pl at the prompt to get a list of all the options for the import program. The -remove old option is used to ensure that any previously imported documents are removed first
Don't worry about all the text that scrolls past—it's just reporting the progress of the import. Be aware that importing this collection takes about five minutes on a 1 GHz computer, and correspondingly longer on slower machines. Note, you do not have to be in either the collect or dlpeople directories when this command is entered; because GSDLHOME is already set, the Greenstone software can work out where the necessary files are.
Now let's make some changes to the collection configuration file to customize its appearance. First, give the collection a name. This will be treated by web browsers as the page title for the front page of the collection, and used as the collection icon in the absence of a picture. Change the line that reads collectionmeta collectionname "dlpeople" to something like collectionmeta collectionname "The People of the NZDL project".
Add a description of your collection between the quotes of the line that reads collectionmeta collectionextra "". This is used as the About this collection text on the collection's home page. I added “This collection is made up of the home pages of some of the people who have worked on the NZDL project.” It is important to enter this as a single line in the editor—don't be tempted to press enter if the cursor reaches the right-hand side of the editor window even though there is more text to add, just keep on typing —otherwise the configuration file cannot be parsed correctly. If you want your collection to be usable with different language interfaces, there is a way to make this text come out differently depending on the interface language chosen. This is described in Section 1.5 below.
You can use any picture you can view in a web browser for a collection icon—the image I created is shown in Figure 2. Put the location of the image between the quotes of the line collectionmeta iconcollection "" in the configuration file. As shorthand, and to aid portability _httpprefix_ can be used as the start of a URL that points to an image within the Greenstone file area. For example you could enter: _httpprefix_/collect/dlpeople/images/icon.gif if you have put a suitable image in the collection's images directory (collect/dlpeople/images in our example).
Save the collection configuration file, and close it—you won't need to look at it again during this tutorial.
The next phase is to “build” the collection, which creates all the indexes and files that make the collection work. Type buildcol.pl at the command prompt for a list of collection-building options. These options are explained more fully in Section 1.3. For now, stick to the defaults by typing
at the prompt. Again, don't worry about the “progress report” text that scrolls past.
Make the collection “live” by putting all the material that has just been put in the collection's building directory into the index directory. If you have built this collection before, first remove the old index using
(assuming you are in the dlpeople directory) at the prompt. Then type
|
Windows |
Linux |
|
Run setup.bat to make Greenstone programs available |
Source setup.bash or setup.csh to make programs available |
|
Copy files from CD-ROM using the visual manager or Windows commands |
Copy files from CD-ROM using mount and Unix commands |
|
Old collection index replaced by typing rd /s index then ren building index followed by mkdir building, or by using visual file manager. |
Old collection index replaced by typing rm —r index/* then mv building/* index |
You should be able to access the collection from your Greenstone homepage. You will have to reload the page if you already had it open in your browser, or perhaps even close the browser and restart it (to prevent caching problems). To view the new collection, click on the image. The result should look something like Figure 3.
In summary then, the commands typed to produced the dlpeople collection are:
Differences between Windows and Unix
The collection building process under Unix is very similar to that under Windows, but there are some small differences which are summarised in Table 1.
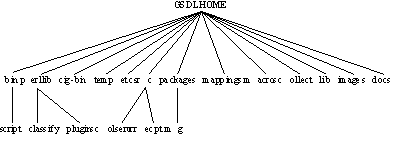
1.2 Greenstone directories
Figure 4 shows the structure of the GSDLHOME directory. Table 2 gives a brief description of the contents of each of the directories shown in the diagram. Some directories are more fully described in a later section of the manual—use the section guide in Table 2 to see where to find more information.
|
Contents |
Section |
|
|
bin |
Executable code, including binaries in the directory with your O/S name. |
— |
|
bin/script |
Perl scripts used for creating and building collections (for example import.pl and buildcol.pl). To get a description of any of these programs, type their name at the command prompt. |
1.3 |
|
perllib |
Perl modules used at import and build time (plugins, for example). |
2.1 |
|
perllib/plugins |
Perl code for document processing plugins. |
2.1 |
|
perllib/classify |
Perl code for classifiers (for example the AZList code that makes a document list based on the alphabetical order of some attribute). |
2.2 |
|
cgi-bin |
All Greenstone CGI scripts, which are moved to the system cgi-bin directory. |
— |
|
tmp |
Directory used by Greenstone for storing temporary files. |
— |
|
etc |
Configuration files, initialisation and error logs, user authorisation databases. |
— |
|
src |
C++ code used for serving collections via a web server. |
3 |
|
src/colservr |
C++ code for serving collections—answering queries and the like. | |
|
src/recpt |
C++ code for getting queries from the user interface and formatting query responses for the interface. |
3.9 |
|
packages |
Source code for non-Greenstone software packages that are used by Greenstone. |
2.5 |
|
packages/mg |
The source code for mg , the compression and indexing software used by Greenstone. |
2.5 |
|
mappings |
Unicode translation tables (for example for the GB Chinese character set). |
— |
|
macros |
The macro files used for the user interface. |
2.4 |
|
collect |
Collections being served from this copy of Greenstone |
1.1 |
|
lib |
C++ source code used by both the collection server and the receptionist. |
3.1 |
|
images |
Images used in the user interface. |
— |
|
docs |
Documentation. |
— |
1.3 Import and build processes
In the command-line collection-building process of Section 1.1, one command, import.pl, is used for importing documents and another, buildcol.pl, for building the collection. Here we learn more about what these programs do and the options that they support. We use the variable col_name to refer to the collection being built or imported.
The import and build processes have many similarities, and as a result take many of the same options, described in Table 3. (Remember that to see the options for any Greenstone script you just type its name with no options at the command prompt).
|
Argument |
Function |
|
|
-verbosity |
Number 0-3 |
Control how much information about the process is printed to standard error; 0 gives a little, 3 gives lots. |
|
-archivedir |
Directory name |
Specify where the Greenstone archive files are stored—that is, where import.pl puts them and where buildcol.pl finds them. Defaults to GSDLHOME/collect/col_name/archives |
|
-maxdocs |
Number >0 |
Indicates the maximum number of documents to be imported or built. Useful when testing a new collection configuration file, or new plugins. |
|
-collectdir |
Directory name |
Specify where the collection can be found. Defaults to GSDLHOME/collect |
|
-out |
Filename |
Specify a file to which to write all output messages, which defaults to standard error (the screen). Useful when working with debugging statements. |
|
-keepold |
None |
Do not remove the result of the previous import or build operation. In the case of import, do not remove the contents of the archives directory; when building, do not remove the content of the building directory. |
|
—debug |
None |
Print plugin output to standard output. |
The import process
The import process's primary responsibility is to convert documents from their native format into the Greenstone Archive Format used within Greenstone, and write a summary file (called archives.inf) which will be used when the collection is built. Import.pl needs to know what plugins should be used, and where to find the original document files. Table 3 shows the options common to both import and build processes; Table 4 shows additional options applicable to the import process only. The OIDtype option deserves some explanation. Each document has an associated Object Identifier or OID. This is best computed by hashing the contents of the document (hash). However, this is slow, so a simpler alternative (incremental) is provided which simply numbers the documents sequentially in the order in which they are imported. You can use incremental for speed, but use hash if you intend adding documents to your collection at a later date (without re-importing).
|
Argument |
Function |
|
|
-importdir |
Directory name |
Where material to be imported is found. Defaults to GSDLHOME/collect/col_name/import. |
|
-removeold |
None |
Remove the contents of the archives directory before importing. |
|
-gzip |
None |
Zip up the Greenstone archive documents produced by import (ZIPPlug must be included in the plugin list, and gzip must be installed on your machine). |
|
-groupsize |
Number >0 |
Number of documents to group together into one Greenstone archive file, defaults 1 (that is, one document per file). |
|
—sortmeta |
Metadata tag name |
Sort the documents alphabetically by the named metadata tag. However, if the collection has more than one group in the collection (i.e. groupsize >1), this functionality is disabled. |
|
-OIDtype |
hash or |
Method of creating OIDs for documents: hash hashes the content but is slow; incremental simply assigns document numbers sequentially, and is faster. |
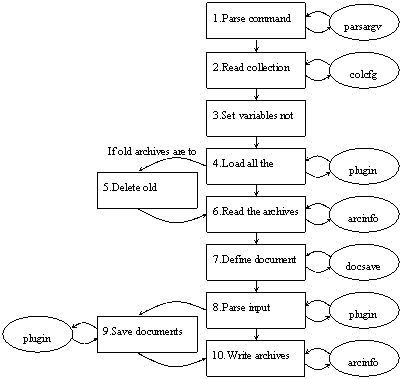
Figure 5 represents the import process implemented by the import.pl program. Each oval represents a module used to perform tasks that relate to a specific part of the Greenstone system. All these modules can be found in the GSDLHOME/perllib directory.
For step 3, note that import variables like importdir and archivedir can be set from the collection configuration file or from the command line. If set in the command line, any configuration file setting is ignored.
In step 6, the archives information file (archives.inf) is created.
Step 7 creates an object that knows where documents are to be saved, and obeys any special saving instructions (such as sortmeta, which sorts the documents according to a specified metadata tag).
Most of the work done in the import process is actually accomplished by plugins, which are called by the plugin module. This module creates a pipeline of the plugins specified in the collection configuration file. It also handles the writing of Greenstone archive documents (using a document object).
The build process
During the building process the text is compressed, and the full-text indexes that are specified in the collection configuration file are created. Furthermore, information about how the collection is to appear on the web is precalculated and incorporated into the collection—for example information about icons and titles, and information produced by classifiers. Buildcol.pl has many options that it shares with import.pl, shown in Table 3, and some that are specific to its purpose, in Table 5.
|
Argument |
Function |
|
|
-builddir |
Directory name |
Specify where the result of building is to be stored (defaults to GSDLHOME/collect/col_name/building). |
|
-index |
Index name (e.g. |
Specify which indexes to build. This defaults to all the indexes indicated in the collection configuration file. |
|
-allclassifications |
None |
Prevent the build process from removing classifications that include no documents (for example, the “X” classification in titles if there are no documents whose titles start with the letter X). |
|
-create_images |
None |
Create collection icons automatically (to use this, GIMP, and the Gimp Perl module, must be installed). |
|
-mode |
all, |
Determine what the build process is to do (defaults to all). All does a full build, compress_text only compresses the document text, infodb creates a database of information pertaining to the collection—name, files, associated files, classification information and the like—and build_index builds the indexes specified in the collection configuration file or on the command line. |
|
—no_text |
Don't store compressed text. This option is useful for minimizing the size of the built indexes if you intend always to display the original documents at run-time. |
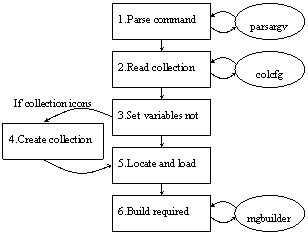
The diagram in Figure 6 represents the execution of buildcol.pl. Many of the steps are common to the import process. The first one that is not is step 4 (to the left). This is performed only if the create_images option has been set. Then, the images are created and registered in the collection configuration file by a function in the buildcol.pl script. For this to work properly, GIMP (Gnu Image Manipulation Program), and the Gimp Perl module, must be installed and properly configured. Also, there must be write (as well as read) access to the collection configuration file.
Step 5 first checks to see whether there is a collection-specific build procedure. A few collections require special build-time processing, in which case a collection-specific builder must be written and placed in the collection's perllib directory, named by the collection name with “builder” suffixed. Collection-specific builders are derived from mgbuilder. In step 5 the builder (be it the default or a collection-specific one) is initialised with information such as how many documents are to be included, whether or not the old version of the collection is to be retained, and where the building and archive directories are located.
Step 6 is the building step, in which the document text is compressed and indexed, collection titles and icons are stored in a collection information database, and data structures are built to support the classifiers that are called for in the collection's plugins. All these steps are handled by mgbuilder (or the collection-specific builder), which in turn uses the mg (“Managing Gigabytes,” see Witten et al., 1999) software for compressing and indexing.
The parts of the collection that are built can be specified by the mode option, but the default is to build everything—compressed text, indexes, and collection information database.
To make a collection available over the web once it is built, you must move it from the collection's building directory to the index directory. Collections are not built directly into index because large collections may take hours or days to build. It is important that the building process does not affect an existing copy of the collection until the build is complete.
1.4 Greenstone archive documents
All source documents are brought into the Greenstone system by converting them to a format known as the Greenstone Archive Format. This is an XML style that marks documents into sections, and can hold metadata at the document or section level. You should not have to create Greenstone archive files manually—that is the job of the document processing plugins described in the next chapter. However, it may be helpful to understand the format of Greenstone files, and so we describe it here.
In XML, tags are enclosed in angle brackets for markup. The Greenstone archive format encodes documents that are already in html, and any embedded <, >, or " characters within the original text ar7e escaped using the standard convention <, > and ".
|
<!DOCTYPE GreenstoneArchive [
|
|
<!ELEMENT Section (Description,Content,Section*)>
|
|
<!ELEMENT Description (Metadata*)>
|
|
<!ELEMENT Content (#PCDATA)>
|
|
<!ELEMENT Metadata (#PCDATA)>
|
|
<!ATTLIST Metadata name CDATA #REQUIRED>
|
|
]>
|
|
<?xml version="1.0"?>
|
|
<!DOCTYPE GreenstoneArchive SYSTEM
|
|
"http://greenstone.org/dtd/GreenstoneArchive/1.0/GreenstoneArchive.dtd" >
|
|
<Section>
|
|
<Description>
|
|
<Metadata name= "gsdlsourcefilename">ec158e.txt</Metadata>
|
|
<Metadata name= "Title">Freshwater Resources in Arid Lands</Metadata>
|
|
<Metadata name= "Identifier">HASH0158f56086efffe592636058</Metadata>
|
|
<Metadata name= "gsdlassocfile">cover.jpg:image/jpeg:</Metadata>
|
|
<Metadata name= "gsdlassocfile">p07a.png:image/png:</Metadata>
|
|
</Description>
|
|
<Section>
|
|
<Description>
|
|
<Metadata name= "Title">Preface</Metadata>
|
|
</Description>
|
|
<Content>
|
|
This is the text of the preface
|
|
</Content>
|
|
</Section>
|
|
<Section>
|
|
<Description>
|
|
<Metadata name= "Title">First and only chapter</Metadata>
|
|
</Description>
|
|
<Section>
|
|
<Description>
|
|
<Metadata name= "Title">Part 1</Metadata>
|
|
</Description>
|
|
<Content>
|
|
This is the first part of the first and only chapter
|
|
</Content>
|
|
</Section>
|
|
<Section>
|
|
<Description>
|
|
<Metadata name= "Title">Part 2</Metadata>
|
|
</Description>
|
|
<Content>
|
|
This is the second part of the first and only chapter
|
|
</Content>
|
|
</Section>
|
|
</Section>
|
|
</Section>
|
Figure 7a gives the XML Document Type Definition (DTD) for the Greenstone archive format. Basically, a document is split up into Sections, which can be nested. Each Section has a Description that comprises zero or more Metadata items, and a Content part (which may be null)—this is where the actual document's contents go. With each Metadata element is associated a name attribute (the name can be anything), and some textual data. In XML, PCDATA stands for “parsed character data”: basically text.
Figure 7b shows a simple document in this format, comprising a short book with two associated images. The book has two sections called Preface and First and only chapter respectively, the second of which has two subsections. Note that there is no notion of a “chapter” as such: it is represented simply as a top-level section
|
gsdlsourcefilename |
Original file from which the Greenstone archive file was generated |
|
gsdlassocfile |
File associated with the document (e.g. an image file) |
The <Section> tag denotes the start of each document section, and the corresponding </Section> closing tag marks the end of that section. Following each <Section> tag is a <Description> section. Within this come any number of <Metadata> elements. Thus different metadata can be associated with individual sections of a document. Most of these are for particular metadata types such as <Title>. The two values of the name attribute shown in Table 6 are treated specially by Greenstone; all others are considered to be metadata that is attached to that section.
In some collections documents are split into individual pages. These are treated as sections. For example, a book might have first-level sections that correspond to chapters, within each of which are defined a number of “sections” that actually correspond to the individual pages of the chapter.
Document metadata
Metadata is descriptive information such as author, title, date, keywords, and so on, that is associated with a document. It has already been mentioned that metadata is stored with documents. Looking at Figure 7a, you can see that <Metadata> tags specify the name of the metadata type, and give a value for that metadata. One example is the line <Metadata name="Title">First and only chapter</Metadata> in Figure 7b—the title of a document is a piece of metadata associated with it. The Dublin Core metadata standard is used for defining metadata types (Dublin Core, 2001; Weibel, 1999; Thiele, 1997).
Table 7 shows what types are available in the standard—starred entries are used in collections available from the New Zealand Digital Library web site today. If there is no type that aptly describes a particular kind of metadata, metadata types that are not in the Dublin Core may be used too. For example, the Demo collection contains how to and Magazine metadata.
|
Name |
Metadata |
Definition |
|
*Title |
Title |
A name given to the resource |
|
*Creator |
Creator |
An entity primarily responsible for making the content of the resource |
|
*Subject and keywords |
Subject |
The topic of the content of the resource |
|
*Description |
Description |
An account of the content of the resource |
|
*Publisher |
Publisher |
An entity responsible for making the resource available |
|
Contributor |
Contributor |
An entity responsible for making contributions to the content of the resource |
|
*Date |
Date |
The date that the resource was published or some other important date associated with the resource. |
|
Resource type |
Type |
The nature or genre of the content of the resource |
|
Format |
Format |
The physical or digital manifestation of the resource |
|
*Resource identifier |
Identifier |
An unambiguous reference to the resource within a given context: this is the object identifier or OID |
|
*Source |
Source |
A reference to a resource from which the present resource is derived |
|
*Language |
Language |
A language of the intellectual content of the resource |
|
Relation |
Relation |
A reference to a related resource |
|
*Coverage |
Coverage |
The extent or scope of the content of the resource |
|
Rights management |
Rights |
Information about rights held in and over the resource |
Inside Greenstone archive documents
Within a single document, the Greenstone archive format imposes a limited amount of structure. Documents are divided into paragraphs. They can be split hierarchically into sections and subsections; these may be nested to any depth. Each document has an associated Object Identifier or OID—these are extended to identify sections and subsections by appending section and subsection numbers, separated by periods, to the document's OID. For example, subsection 3 of section 2 of document HASHa7 is referred to as HASHa7.2.3.
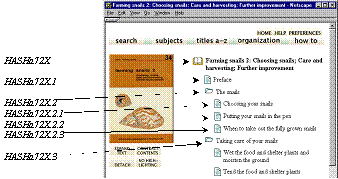
When you read a book in a Greenstone collection, the section hierarchy is manifested in the table of contents of the book. For example, books in the Demo collection have a hierarchical table of contents showing chapters, sections, and subsections, as illustrated in Figure 8a. Documents in the Computer Science Technical Reports collection do not have a hierarchical subsection structure, but each document is split into pages and you can browse around the pages of a retrieved document. Chapters, sections, subsections, and pages are all implemented simply as “sections” within the document.
The document structure is also used for searchable indexes. There are three possible levels of index: document, section, and paragraph, though most collections do not use all three levels. A document index contains the full document—you use it to find all documents that contain a particular set of words (the words may be scattered far and wide throughout the document). When a section index is created, each portion of text that is indexed stretches from a <Section> tag to the next-occurring <Section> tag—thus a chapter that immediately begins with a new section will produce an empty document in the index. Sections and subsections are treated alike: the hierarchical document structure is flattened for the purposes of creating searchable indexes. Paragraph-level indexes consider each paragraph as a separate document, and are useful for doing more focused searches.
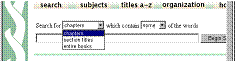
The pulldown menu in Figure 8b shows the searchable indexes for the Demo collection. “Chapters” and “section titles” are section-level indexes, while “entire books” is a document-level index. As well as indexes of text, indexes of any kind of metadata can also be created. For example, some collections offer searchable indexes of section titles, and Figure 8b illustrates this.
1.5 configuration file
The collection configuration file governs the structure of a collection as seen by the user, allowing you to customise the “look and feel” of your collection and the way in which its documents are processed and presented. A simple collection configuration file is created when you run mkcol.pl, which records your E-mail address as the creator and maintainer. Remember from the earlier walkthrough that the creator argument is mandatory—unless specified separately, the same information is recorded as the maintainer.
|
creator
|
E-mail address of the collection's creator |
|
maintainer
|
E-mail address of the collection's maintainer |
|
public
|
Whether collection is to be made public or not |
|
beta
|
Whether collection is beta version or not |
|
indexes
|
List of indexes to build |
|
defaultindex
|
The default index |
|
subcollection
|
Define a subcollection based on metadata |
|
indexsubcollections
|
Specify which subcollections to index |
|
defaultsubcollection
|
The default indexsubcollection |
|
languages
|
List of languages to build indexes in |
|
defaultlanguage
|
Default index language |
|
collectionmeta
|
Defines collection-level metadata |
|
plugin
|
Specify a plugin to use at build time |
|
format
|
A format string (explained below) |
|
classify
|
Specify a classifier to use at build time |
Each line of the collection configuration file is essentially an “attribute, value” pair. Each attribute gives a piece of information about the collection that affects how it is supposed to look or how documents are to be processed. Table 8 shows the items that can be included in a collection configuration file, and what each is used for. As well as these, all the command-line options for import.pl and buildcol.pl may be specified in a collection configuration file—e.g. a line reading no_text true will set buildcol.pl's no_text option.
The collection configuration file created by the mkcol.pl script, shown in Table 9, is a very simple one and contains a bare minimum of information. Lines 1 and 2 stem from the creator value supplied to the mkcol.pl program, and contain the E-mail addresses of the person who created the collection and the person responsible for maintaining it (not necessarily the same person).
|
Attribute |
Value |
|
|
1
|
creator
| |
|
2
|
maintainer
| |
|
3
|
public
|
True |
|
4
|
beta
|
True |
|
5
|
indexes
|
document:text |
|
6
|
defaultindex
|
document:text |
|
7
|
plugin
|
ZIPPlug |
|
8
|
plugin
|
GAPlug |
|
9
|
plugin
|
TextPlug |
|
10
|
plugin
|
HTMLPlug |
|
11
|
plugin
|
EMAILPlug |
|
12
|
plugin
|
ArcPlug |
|
13
|
plugin
|
RecPlug |
|
14
|
classify
|
AZList metadata Title |
|
15
|
collectionmeta
|
collectionname "sample collection" |
|
16
|
collectionmeta
|
iconcollection "" |
|
17
|
collectionmeta
|
collectionextra "" |
|
18
|
collectionmeta
|
.document:text "documents" |
Line 3 indicates whether the collection will be available to the public when it is built, and is either true (the default, meaning that the collection is publicly available), or false (meaning that it is not). This is useful when building collections to test software, or building collections of material for personal use. Line 4 indicates whether the collection is beta or not (this also defaults to true, meaning that the collection is a beta release).
Line 5 determines what collection indexes are created at build time: in this example only the document text is to be indexed. Indexes can be constructed at the document, section, and paragraph levels. They can contain the material in text, or in any metadata—most commonly Title. The form used to specify an index is level:data. For example, to include an index of section titles as well, you should change line 5 to indexes document:text section:Title. More than one type of data can be included in the same index by separating the data types with commas. For example, to create a section-level index of titles, text and dates, the line should read indexes section:text,Title,Date. The default index defined in line 6 is the default to be used on the collection's search page.
Lines 7—13 specify which plugins to use when converting documents to the Greenstone archive format and when building collections from archive files. Section 2.1 gives information about what plugins are available. The order in which plugins are listed is the order in which they are tried on each document, and once a plugin that is able to process a document is found, no more are tried.
Line 14 specifies that an alphabetic list of titles is to be created for browsing purposes. Browsing structures are constructed by “classifiers”. Section 2.2 gives information about classifiers and what they can do.
Lines 15—18 are used to specify collection-level metadata. Specified through collectionname, the long form of the name is used as the collection's “title” for the web browser. The collectionicon entry gives the URL of the collection's icon. If an index is specified (as in line 18), the string following is displayed as the name of that index on the collection's search page. A particularly important piece of collection-level metadata is collectionextra, which gives a stretch of text, surrounded by double quotes, describing the collection. This will be shown as the “About this collection” text. You can put in different versions of collectionextra for different interface languages by adding a language specification in square brackets. For example,
collectionmeta collectionextra "collection description"
collectionmeta collectionextra [l=fr] "description in French"
collectionmeta collectionextra [l=mi] "description in Maori"
If the interface language is set to “fr” or “mi”, the appropriate version of the description will be displayed. For other languages the default version will appear.
This simple collection configuration file does not include any examples of format strings, nor of the subcollection and language facilities provided by the configuration file. Format strings are covered more thoroughly in Section 2.3, but we will look at subcollections and languages here.
Subcollections
Greenstone allows you to define subcollections and build separate indexes for each one. For example, in one collection there is a large subset of documents called Food and Nutrition Bulletin. We use this collection as an example.
This collection has three indexes, all at the section level: one for the whole collection, one for the Food and Nutrition Bulletin, and the third for the remaining documents. The relevant lines from the collection configuration file can be seen below.
The second and third lines define subcollections called fn, which contains the Food and Nutrition Bulletin documents, and other, which contains the remaining documents. The third field of these definitions is a Perl regular expression that identifies these subsets using the Title metadata: we seek titles that begin with Food and Nutrition Bulletin in the first case and ones that do not in the second case (note the “!”). The final i makes the pattern-matching case-insensitive. The metadata field, in this case Title, can be any valid field, or Filename to match against the document's original filename. The fourth line, indexsubcollections, specifies three indexes: one for the fn subcollection, one for the other subcollection, and the third for both subcollections (i.e. all the documents). Note that if two entries had been specified on the indexes line, the total number of indexes generated would have been six rather than three.
If a collection contains documents in different languages, separate indexes can be built for each language. Language is a metadata statement; values are specified using the ISO 639 standard two-letter codes for representing the names of languages—for example, en is English, zh is Chinese, and mi is Maori. Since metadata values can be specified at the section level, parts of a document can be in different languages.
For example, if the configuration file contained
section text, section title, document text, and paragraph text indexes would be created for English, Chinese, and Maori—twelve indexes altogether. Adding a couple of subcollections multiplies the number of indexes again. Care is necessary to guard against index bloat.
(This index specification could be defined using the subcollection facility rather than the languages facility. However, since the syntax precludes creating subcollections of subcollections, it would then be impossible to index each language in the subcollections separately.)
Cross-collection searching
Greenstone has a facility for “cross-collection searching,” which allows several collections to be searched at once, with the results combined behind the scenes as though you were searching a single unified collection. Any subset of the collections can be searched: the Preferences page allows you to choose which collections are included in the searches.
Cross-collection searching is enabled by a line
where the collections involved are called col_1, col_2, … The same line should appear in the configuration file of every collection that is involved.
[1] On Windows 95/98 systems running setup.bat may fail with an Out of environment space error. If this happens, you should edit your system's config.sys file (normally found at C:\config.sys) and add the line shell=C:\command.com /e:4096 /p (where C: is your system drive letter) to expand the size of the environment table. You'll need to reboot for this change to take effect, and then repeat the steps above for Greenstone.